Adding Products
Setting up products in the best way possible is highly important for a store. Make sure to not miss any detail, such displaying different size and color options, giving a thorough product description, adding appealing pictures, etc.
To add a new product, go to Catalog → Products. Click Add new button in the right top corner.
Adding New Product page are available in two modes: advanced and basic (in Advanced mode by default). You can switch to the Basic mode and select the required fields in Settings.
General Information
Start by filling up General Information on the Product info panel:
- Set up your product as Simple or Grouped (read more about it here)
- Enter your Product Name
- Tick Visible individually if you want the product to be in catalog or search results, otherwise the product will be hidden in the catalog and accessible only from a grouped product details page.
- Enter the product Short Description that will be displayed in the catalog
- Enter the product Full Description that will be shown on the product page. Here you can add text, bullet points, links, or additional images. Make sure to write a detailed description as it affects your buyers' decision making
- Enter SKU, the product stock keeping unit, used internally for tracking the product. This is your internal unique ID used to track this product.
- Tick Published, to make the product visible in your store.
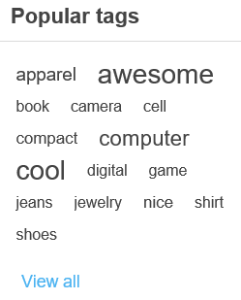
- Enter Product Tags, the keywords for product identification. Enter tags separating them by comma. The more products are associated with a particular tag, the larger it will look in the Popular Tags area, displayed in the sidebar of the Catalog page

- Enter GTIN (global trade item number). These identifiers include UPC (in North America), EAN (in Europe), JAN (in Japan), and ISBN (for Books).
- Enter Manufacturer part number - a part number provided by a manufacturer for the product.
- Show on homepage. If this checkbox is selected, the store owner can also specify the Display Order.
- Tick Allow customer reviews, to enable customers to provide reviews of the product.
- Define Available Start date and/or Available End date of the product availability.
- Tick Mark as new, to mark the product as recently added. This way you can manage a list of products displayed on the "New products" page. You can also specify a period during which this product will be marked as new.
- In the Admin comment field enter a comment for information purposes.
Product Class
Define whether the product is a
- Gift Card
- Downloadable Product
- Recurring Product
- Rental Product
Product Price
In the Prices section define:
- Price, in a predefined currency. Note that you can change the store currency in Configuration → Currencies.
- Old price. If it is larger than zero it becomes visible in the public store and is displayed beside the new price for comparison purposes.
- Product cost, the sum of all costs associated with the production of the product or service. This cost is not displayed to customers.
- To Disable buy button. This can be useful for products “upon request”.
- To Disable wishlist button.
- Available for pre-order if the product is not in the store yet, but you want the customers to be able to order it. The Pre-ordered button will be displayed to replace the standard Add to cart button. When this option is selected, the Pre-order availability start date field is displayed. Enter the availability start date of the product in UTC. The Pre-order button will be changed to Add to cart when this date is reached.
- Call for Price, to show Call for Pricing or Call for Quote instead of the price. This can help you to establish a contact with your customers and provide with additional information about the product they are interested in.
- Customer enters price, to indicate that a customer must enter the price. When selected, the following fields are displayed:
- In the Minimum amount field, enter the minimum amount for the price.
- In the Maximum amount field, enter the maximum amount for the price.
- PAngV (base price) enabled, if the product has a base price. This is required according to the German law (PAngV). For example, if you sell 500ml of beer for 1,50 euro, you have to show the base price: 3.00 euro per 1L. When selected, the following fields are displayed:
- Amount in product - amount of the product that is being sold.
- Unit of product - measure of a previously entered value.
- Reference amount - the base amount.
- Reference unit - measure of a previously entered value.
- Discounts. - setup the discounts
- Whether the product is exempted from tax, by ticking Tax exempt. Otherwise, from the Tax category dropdown list, select the required tax classification for this product. Tax categories can be configured by the store owner in the Configuration → Tax → Tax Categories.
- The product as Telecommunications, broadcasting, and electronic services, to apply special tax rules used in the European Union.
- Set up tier prices if required.
Inventory Settings
Define the inventory settings for the product
Shipping Details
Define product-specific shipping details:
- Tick Shipping enabled if the product can be shipped. The section then expands for more details.
- Set the product parameters which will be used for the shipping calculation: Weight, Length, Width, Height. Note that you can change predefined measures in Configuration → Shipping → Measures.
- Free shipping if the product is shipped for free
- Ship separately if the product should be shipped separately from other products. If the order includes several items of the product, all of them will be shipped separately.
- Additional shipping charge
- Delivery date which will be displayed in the public store. Note that you can manage delivery date options in Configuration → Shipping → Delivery Dates.
Mappings
- In the Mappings section define:
- Categories. You can assign a product to as many categories as you want. Note that you can manage product categories in Catalog → Categories.
- Manufacturer. You can assign a product to as many manufacturers as you want. Note that you can manage manufacturers in Catalog → Manufacturers.
- Limited to stores, if the product is sold in specific stores. Leave the field empty in case this functionality is not required. Note that in order to use this functionality you have to disable the following setting: Configuration → Catalog Settings → Ignore **“Limit per store” rules **(sitewide). .
- Vendor. You can manage vendors in Customers → Vendors
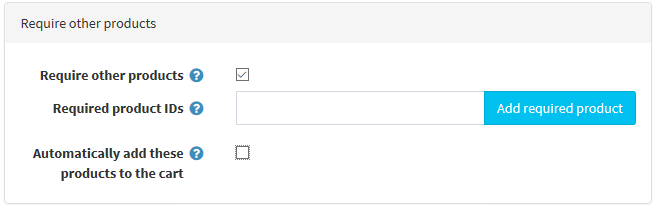
Require other products
Define whether the product Requires other product. In this case select the Required product IDs entering them by comma, ensure that there are no circular references, e.g. A requires B, B requires A. Chose to Automatically add these products to the cart if required.
Product Pictures
Go to Pictures tab on Edit product details page to add product pictures.
- In the Add a new picture area, click Upload to select a new picture you want to upload to your product page.
- In the Alt field, enter a value for the "alt" attribute of "img" HTML element. If empty, then a default rule will be used (e.g. product name).
- In the Title field, enter a value for the "alt" attribute of "img" HTML element. If empty, then a default rule will be used (e.g. product name).
- Define the Display order of the image on a product page.
Attributes
On the Product attributes tab, add Product attributes. Once you have a list of the attributes created, click Add new record on the Attributes tab. The grid is expanded, as follows:
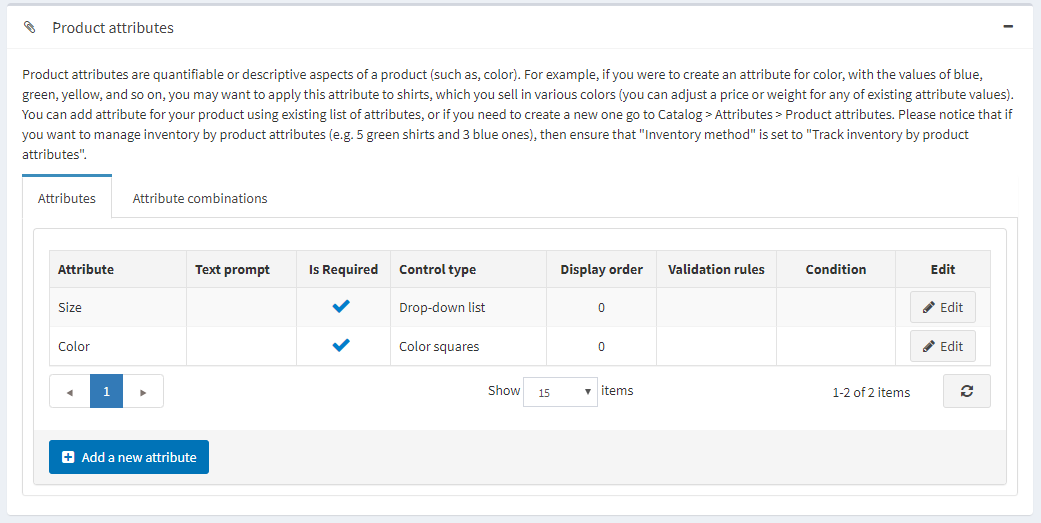
- From the Attribute dropdown list select an attribute.
- Fill the Text Prompted field, if you want some text to be shown in front of this attribute in a public store.
- Tick Is required to set this attribute as required for customers.
- Define the Control type for this attribute (e.g. dropdown list, radio button list, etc.).
- Define the Display Order for this attribute.
- Click Update.
- The Values field now displays a number of predefined values for this attribute. View/Edit values, if required.
- If required, define Conditions for this attribute, i.e. this attribute becomes visible when other attributes have certain values.
On the Attribute Combinations tab, define different attribute combinations and the following information for each of them:
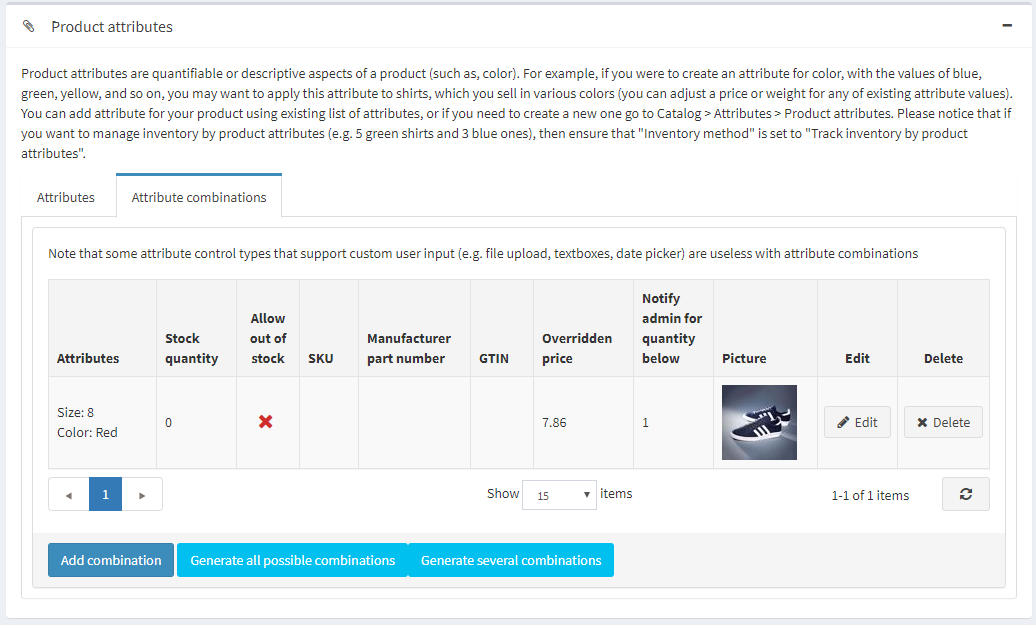
- Stock quantity
- Allow out of stock, if you want your customers to be able to purchase products with certain attributes, when out of stock
- SKU, Manufacturer part number, GTIN
- Overridden price, if the price for products with certain attributes is different from the product regular price
- Product combination quantity under which the admin will be notified
On the Specification Attributes tab, add Specification attributes.
To add a new attribute, fill the Add a new product specification attribute section:
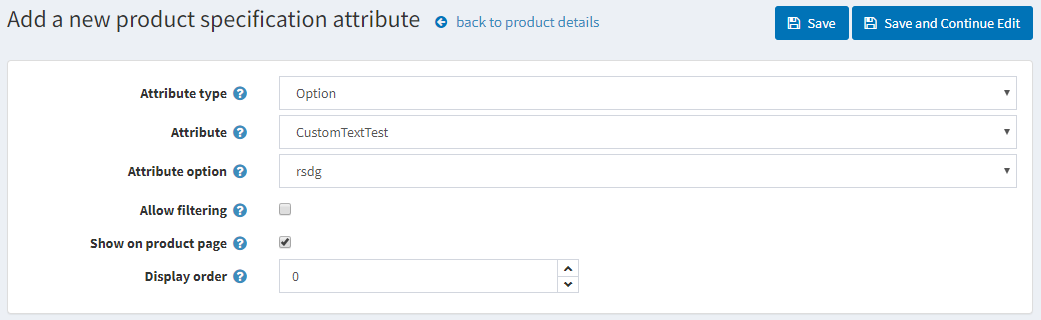
- Select an Attribute type from a drop down list.
- Choose the Attribute from a list of pre-created attributes.
- Choose the Attribute option.
- Allow filtering by this option on a category page, if required.
- Tick Show on product page, to make the attribute visible on a product page.
- Set the attribute Display order. 1 represents the top of the list.
- Click Add attribute.
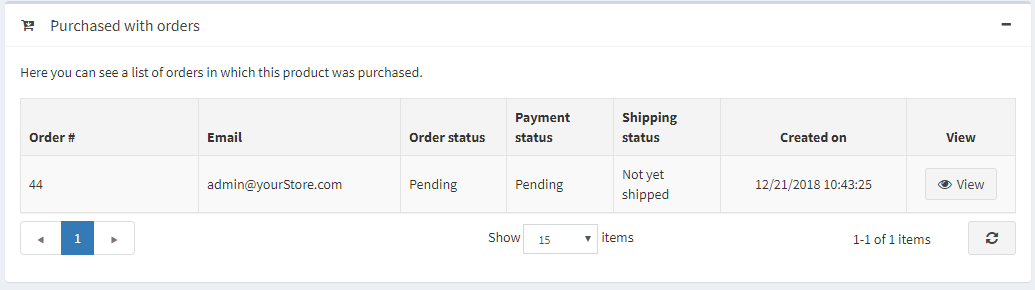
List of Orders with the product
To view a list of orders in which the product was purchased, go to the Purchased with orders tab. Here you can check an order's status and click to view the order in details.
SEO
Define the following SEO parameters for the product page:
- Meta keywords - a brief and concise list of the most important themes (keywords and key phrases) related to the product. These words will be added to the product page header.
- Meta description - a brief description of the product that will be added to the product page header.
- Meta title - a title for the Web page.
- Search engine friendly page name - a name of the page used by search engines. If you enter nothing then the product page URL is formed using the product name. If you enter custom-seo-page-name, then the following custom the URL will be used: http://www.yourStore.com/custom-seo-page-name.
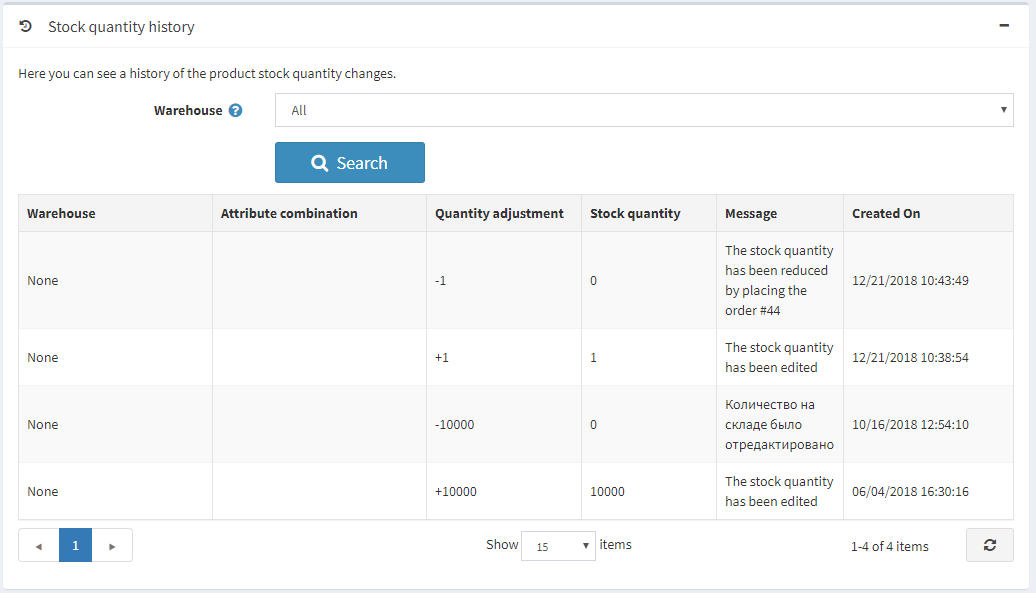
Stock Quantity History
On this tab you can view all the product quantity changes, orders with the product.