PrivateIM
The PrivateIM is used to communicate with individual team members privately or to post on an activity that you are a part of. It also allows adding files to the communication.
All the activities in SmartZone will be listed on the left-hand side of the screen.
This article will guide you in navigating your PrivateIM gadget.
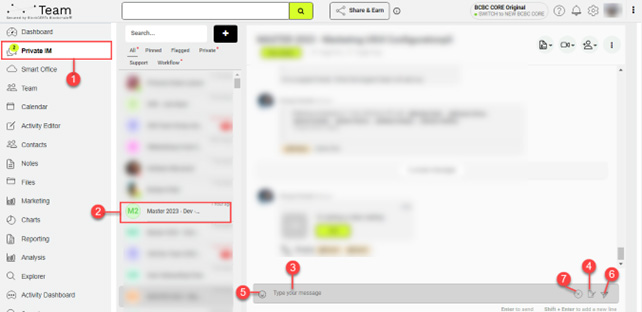
- Click on PrivateIM.
- Select the activity channel where you wish to chat with other team members.
- Type in your message in the text box.
- (Optional) If you want to attach a file, click on the paper-and-pen icon.
- (Optional) To add an emoji, you can use the emoji picker located to the left of the message field.
- Once you are done, click on the paper airplane icon to send the message.
- Otherwise, click on the X icon to cancel your message.
Starting a New Private Chat
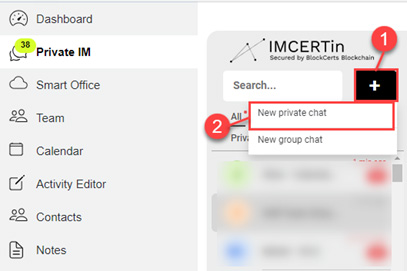
- To start a new private chat, click on the + button.
- A drop-down will be displayed. Select New private chat.
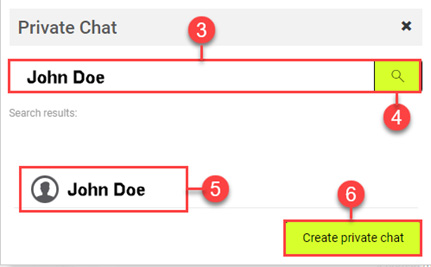
- The Private Chat window will appear. In the search contact field, enter the name of the contact you would like to have a private chat with.
- Click on the magnifying glass button.
- Select the contact from the search results.
- Click Create private chat. This will create a new private chat window with your chosen contact.
Note
- The online or offline status of the contact is indicated by a green dot for online or a red dot for offline on the contact’s name.
Adding Participants to the Chat
When you click on the Attendees icon, it will give you 3 options on how to invite participants to your meeting:
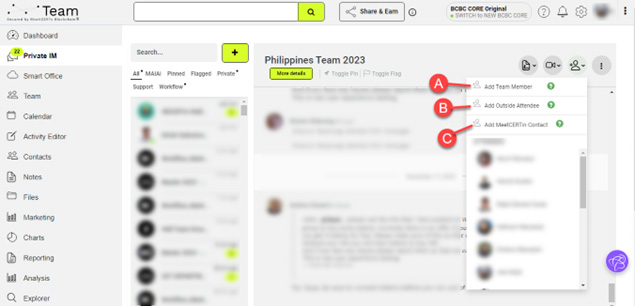
- Add Team Member
- Add Outside Attendee
- Add MeetCERTin Contact
A. Add Team Member
This option enables you to invite an existing team member.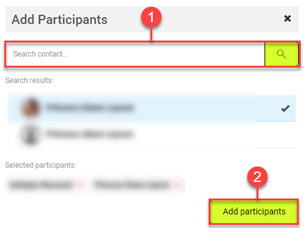
- After clicking on Add Team Member, you are required to type in the name of the participant you wish to be added.
Note:- Every time you select a participant, a checkmark will appear alongside their name and their name will also be listed in the Selected participants section.
- Once you are done selecting the members, click Add Participants to confirm.
B. Add Outside Attendee
This option allows you to add a user to be a part of the workspace and activity.
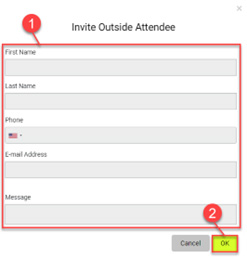
- After clicking on Add Outside Attendee, you are required to type in the following information of the contact you would like to add: First Name, Last Name, Phone, E-mail Address, and Message.
- Once you are done, Click OK.
C. Add MeetCERTin Contact
This option enables you to add an external user who will be given a MeetCERTin workspace only. They can interact with you in this workspace.
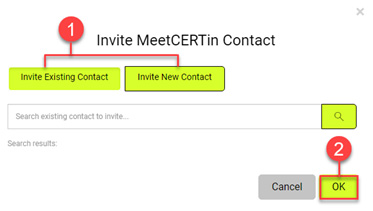
- After clicking on Add MeetCERTin Contact, you can either Invite Existing Contact by typing in the name of the existing contact in the search box or Invite New Contact by entering their personal information.
- After you have selected the contacts to be added, click on the OK button to confirm.
Starting a New Group Chat
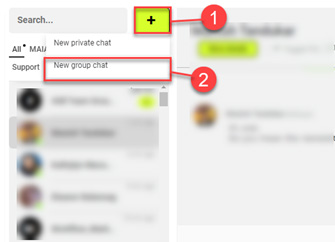
- To start a new group chat, click on the + button.
- A drop-down list will be displayed. Select New group chat.
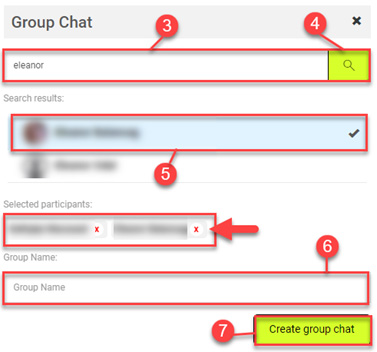
- In the search contact field of the Group Chat window, enter the name of the contact you would like to have a group chat with.
- Click on the magnifying glass button.
- Select the contact from the search results. The selected contact name will be listed in the Selected Participants section. Repeat step c until you have added all the contacts for the group chat.
- Type in the Group Name.
- Click Create group chat. This will create a new group chat window with your selected contacts.
Badges
Different badges are available for various activities.
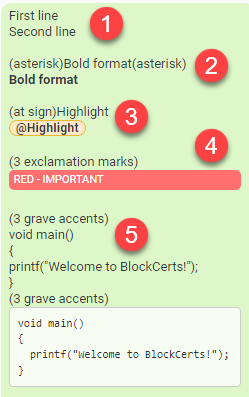
- To go to the next line, hold and press [Shift] + [Enter].
- To make a message, text, or phrase in bold format, wrap it in asterisks *.
- To highlight a name or a word, use the @ symbol at the beginning of the name or word.
- To mark a message as important, precede your text with three (3) exclamation marks !!!.
- Add three (3) grave accents at the beginning and end of the line to send a code or large documentation.
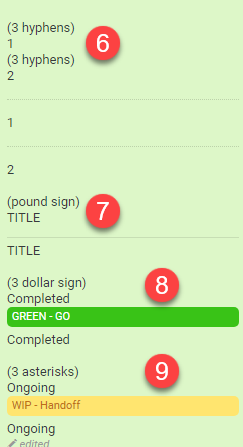
- To add a line, enter three (3) hyphens ---.
- To add a title, use the hashtag # symbol and enter the text in the next line.
- To mark a message as a completed task, precede your text with three (3) dollars $$$.
- To mark a message as an ongoing task, precede your text with three (3) asterisks ***.
Note: The two operators, $$$ and ***, are only valid when the user role has permission to use them. The API method is handling it when a message is posted. It checks for permissions and removes the preceding operators from the text or message if permission is not found for that user.