Creating Contacts
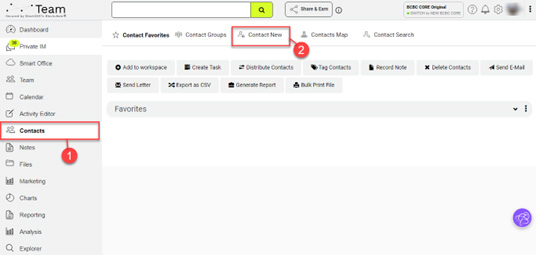
Select Contacts from the left menu as seen in the screenshot below.
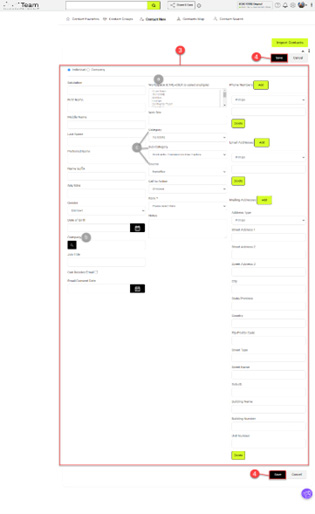
Select tab as shown in the above screen, to display a blank Contact Editor. Follow the steps below to use this screen to add additional individual Contacts to 1to1Core
Tip: For lots of contacts, consider importing them. Please see our article on Importing Contacts for ways to save time when dealing with bulk contacts
Contact Editor
The Contact Editor has all the fields for creating / editing a contact. Fill in as much data as you can, it may come in handy later!
Projects: Every Contact must be placed in at least one “Workspace”. Which users can view the Contact depends on where you place the contact. Each company sets up their project spaces as per their particular needs. Contact your System Administrator for information on how to use your Project Spaces within your organization's account.
Company: Contacts that share the same name in the Company field are linked together and can be easily found and worked with.
Category, Sub-Category and Source: These three fields together called "Sources". They work together to categorize where the contact came from. Contact your system administrator for information about your instance's usage of Sources. The items in the dropdown menu for Sources can be added to by System Administrators
Example:
Category: Event
Sub-Category: Trade Show
Source: WPC 2011
Rank: A contact has only one Rank, but it can be changed as the status of the contact changes. Contact your System Administrator for information about your instance's usage of Ranks.
Phone Numbers, Email Addresses and Mailing Addresses: The type "Primary" is used when you want to send an email creator where at the least one email address should be marked as “primary” in the contact record. Click "Add" to create more contact records
Editing Contacts
This article is about editing Contact Record information
Here you can edit contact information, designate them as a Favorite, associate them with Project Spaces, assign Tags, associate them with Process Flows, add Notes, create Activities, add Additional Information and upload Files with them.
You can have multiple Contacts open at once, with each open Contact being displayed on the Contacts menu bar. Having too many contacts and groups open at the same time can affect performance, so click the "X" to close tabs when no longer needed
At the top you have options and “x” (close the contact). Closing the contact does not delete them. Click on the
icon to display the Contact Editor, This is same page that is displayed for Creating Contacts.
Favorite Contacts
This gadget allows you to mark any of your contacts as a Favourite for quick access by clicking on the icon. Designating a contact as a Favourite will put them in My Office and on your Favorites tab.
Link to Contact
This gadget creates a link to the contact which the user can copy to any location. To access this, click on icon which will display the following window where the link to the contact is displayed
Visit Website
This option is used if the user wants to visit the website that the contact has added to his information. This is usually useful when you create a Company Contact. To access this click on the icon which will take you a new tab where the website will be displayed
Activities
You can view the list of Activities that the contact is assigned to below this tab.
There are two buttons:
- this button when clicked will display all the activities that were completed
- this button when clicked will allow you to create an activity. For further information, refer to Activities section of the help
Additional
When the contact fills in some forms or uploads completed templates, all those are displayed under this tab. This tab stores and displays all additional information of the contact.
You can also add Additional Information templates, by choosing the Add Information Template option from the drop down as shown below:
Files
You can add new files using the to display the following window
Click on the button to select a file and copy it to this window and then click on
to upload the file. If you do not want to upload a file that you have copied in the window, click
to delete it. All the files that are added are displayed in the form of a list as shown below
Please refer to the Files tab on the help for further information
History
Any Notes that are created through the Notes gadget will get saved under this tab as shown below
Notes
You can add notes from the Contact Record using the text editor and by clicking
Any Notes added here will be displayed within the History gadget on the contact information page.
- Type in the details of the Note in the text box provided
- Use the text editor to put as little or as much formatting as you need.
- Select the type of Note that you want to create from the Note Type list. Available options are Phone, Email and General.
- Click
to finish
Group Contact Operations: Selecting 'Record Note' from the menu displays the Record Bulk Note editor, which allows you to save a note to all selected contacts at once
Processes
You can add new process or view all the processes associated with this contact in the form of a list below this tab as shown below
If you want to add a new process, select the Add Process option from the drop down list as shown above to display the following
Select the required process that needs to be added from the drop down list below Process Type and enter all the other information if required and save the process
Social
You can create your own Twitter or Facebook widget and display it below this tab. To create or set up a new widget select the option Setup Instructions as shown below
This will provide you with a set of instructions on how to create your own widget and then display it here
Tags
Tags are quick ways to mark contacts for future recall. You can b for the tag or create a group that uses the tag to get a list you need. To access the tag gadget, click on the tab below contact information to display the following details
Start typing a tag name in the text box below “Tags” and wait for a second and the system will look for similar already entered tags and provide you with a drop down list and will allow you to select them. If no matches are found, just finish typing and click on the "Add" button
Workspaces
Contacts that have clicked an "unsubscribe" link from one of your email campaigns will have a deselected workspace under "Subscribed”. You can add more than one project to a contact. To add a contact to a list of projects.
Select Add contact to Projects option from the drop down list as shown below:
This will display a Add to Projects window which will display a list of projects as shown below
Select the required projects and click on to display the projects below Workspaces
Contact Operations
Create Task
Select 'Create Task' from the Contact Operations menu to display the Task Editor with the contact already added as an Attendee. Please refer to the Using Activities for details on adding an Activity for a Contact
Send an Email
Selecting the "Email" button will automatically start your email client application and create a blank email addressed to the contact