Message Manager
The Message Manager is a secure, cloud-based portal for communication needs and is accessible by the administrator and support roles. Send and receive messages, view receipts and replies, and search the message history of all recipients, either individually or as part of one or more groups.
After logging in to your administrator or support account, follow these simple steps to get you started:
Click on Account Preferences (cogwheel icon) in the upper-right corner.
On the left-hand panel, select Messages.
You will be redirected to the Message Manager page. It enables you to view and create messages.
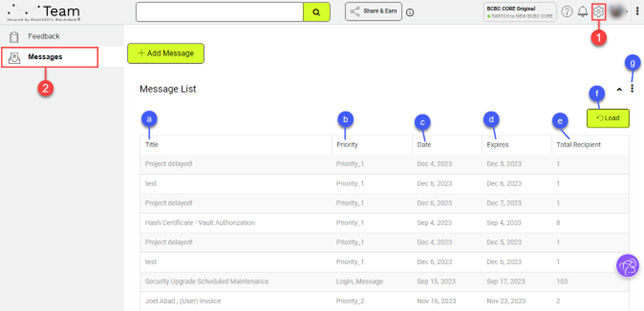
a. Title refers to the Message Title.
b. Priority is the level of priority of your message.
c. Date is the start date when your message will be displayed.
d. Expires is the end date when your message will expire.
e. Total Recipient refers to the number of recipients that will receive your message.
f. Load refreshes the message list.
g. More Options enables you to refresh the message list, minimize or maximize the message list display, and provide more detailed online help about the Message Manager.
Message Editor
Click on the Add Message button to open the Message Editor.

- Message Title
Enter the title or name of your message.
- Set Priority
This enables you to set the priority level of your message.
- Display Date (From)
To set the start display date of your message, enter or select the current date. Note that previous dates are not valid.
- Display Date (Expires)
To set the end display date of your message, enter or select the date, that is, from the current date onward. Previous dates are invalid.
- Add URL
You can also enter a specific URL that is related to your message.
- Message Description
Type in your message in this box.
- Add Recipients
Type in and select the recipient(s) you wish to add.
- Choose Role
Select your current role from the dropdown list.
- Choose Contact Group
Select a group from the dropdown list.
- Preview
You can click on the Preview button to see how the message will look like when they are sent to the recipient(s).
- Create message
Click on this button to create a message. This message will be listed in your Message List.
- Cancel
Click on this button to cancel the create a message operation.